Chain Tests Together
Write Your First Test covered a single, self-contained test. Real applications rarely work that way: you register before you log in, log in before you check out, and create an order before you can cancel it.
You could write that as one enormous test, but you should not. A monolithic test re-runs the whole journey every time you change the last step, and when it fails you get one verdict for twenty actions. Splitting the journey into separate tests and declaring the dependencies between them gives you a precise failure location and lets the agent skip work it knows cannot succeed.
This guide builds a two-test chain: the first test discovers a value, the second consumes it.
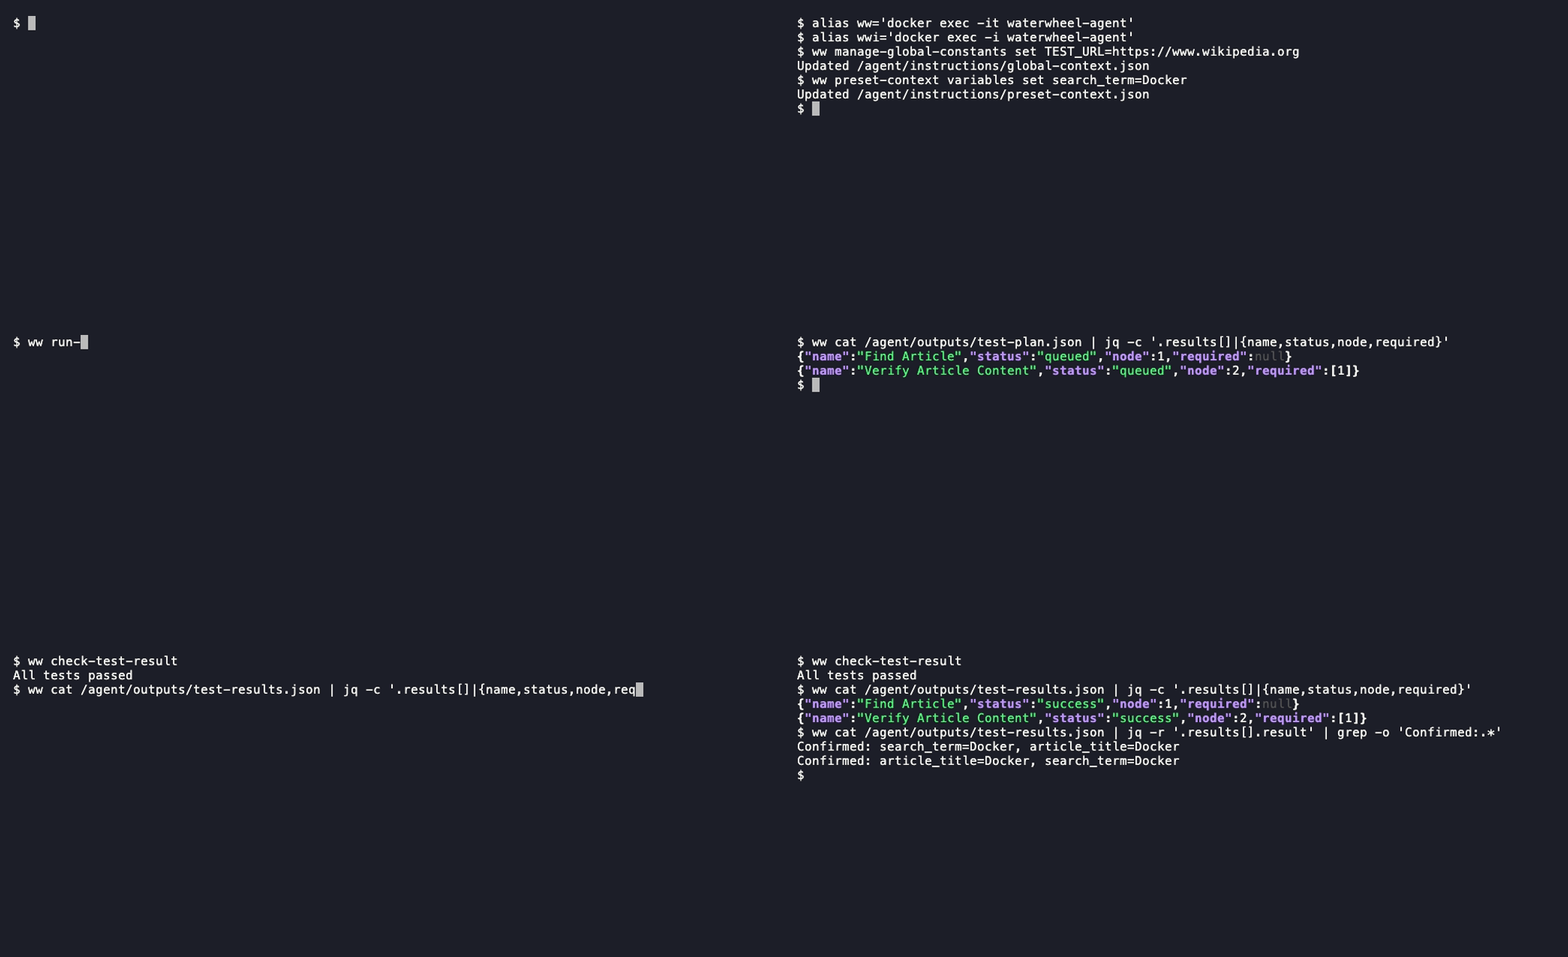
A real recording of the steps below against the 1.4.0 image. ww and wwi are aliases for
docker exec -it waterwheel-agent and docker exec -i waterwheel-agent, defined on the first two
lines. Waiting for the two runs to finish is cut; all command output plays at normal speed.
You need a running, configured container — Quick Start steps 1 to 3 — and the workflow from Write Your First Test should already be familiar, since this guide does not re-explain uploading tasks or setting domain permissions.
The Three Data Layers
Before writing anything, it helps to know where a test's inputs can come from. Waterwheel gives every test access to three layers, so values do not have to be hard-coded into task files:
| Layer | Holds | Set with | Lifetime |
|---|---|---|---|
| Global context | Static values shared by every test — base URLs, tenant IDs, shared accounts | manage-global-constants | Until you change it |
| Preset context | Seed values for a run, which a test may read or overwrite | preset-context variables | Loaded before the first task |
| Runtime context | Values one test discovers and later tests consume | Natural language in the test body | The current run |
The reason this matters: because a test refers to its inputs by name, the same task file runs unchanged against dev and staging — only the layer supplying the value changes. In dev a password might come from a preset value; in staging the same test reads a password generated at runtime by an upstream account-creation test, and the file itself does not move a character.
Global context is injected into the agent's system prompt, so tests can refer to those names
directly. Preset and runtime values live in the context store, and tests reference them with a
context. prefix — ${context.search_term}. See
Pass Data Between Tests for the full rules.
Use UPPERCASE for global constants and lowercase or camelCase for preset and runtime values. Both
namespaces are case-sensitive, and the convention keeps you from shadowing one with the other.
1. Set the Global Context
Our chain tests Wikipedia, so the base URL is a static value every test needs:
docker exec -it waterwheel-agent manage-global-constants set TEST_URL=https://www.wikipedia.org
Confirm it:
docker exec -it waterwheel-agent manage-global-constants list
{
  "TEST_URL": "https://www.wikipedia.org"
}
Comma-separate to set several at once, and use dotted keys for nested values —
user.username=qa_user becomes { "user": { "username": "qa_user" } }. See
manage-global-constants.
2. Seed a Preset Value
The term our chain searches for is an input to the run, not a fixed property of the environment. That makes it a preset value — something you can change between runs without touching a task file:
docker exec -it waterwheel-agent preset-context variables set search_term=Docker
docker exec -it waterwheel-agent preset-context variables list
Preset values are loaded into the context store before the first task runs. Unlike global context they are not injected into the system prompt, and a test is free to overwrite one.
3. Write the Producer Test
The first test finds an article and saves what it found. Note step 4 — you ask for a context write in plain language:
---
name: Find Article
id: 1
---

# Find Article

1. Go to TEST_URL.
2. Type the value of `${context.search_term}` into the search box and submit the search.
3. Verify an article page loads.
4. Save the exact page heading to the context as `article_title`.
Three things to notice:
TEST_URLis referenced by bare name, because global constants are in the system prompt.${context.search_term}reads the preset value from step 2.- "Save the exact page heading to the context as
article_title" is how you write to runtime context. Phrases like save X to the context, store X in the context, or remember X all work — there is no special syntax.
4. Write the Consumer Test
The second test reads what the first one stored:
---
name: Verify Article Content
id: 2
---

# Verify Article Content

1. Verify `${context.article_title}` is present in the context. If it is missing, fail this test immediately.
2. Go to TEST_URL.
3. Search for `${context.article_title}` and open the matching article.
4. Verify the page heading is `${context.article_title}`.
5. Verify the first paragraph mentions `${context.search_term}`.
Step 1 exists on purpose. Even with the dependency declared in the next section, make the consumer
check its inputs before it does anything else. A test that fails with "article_title missing from
context" tells you where the problem is; one that wanders through a search box with an empty string
does not.
Upload both tests. Note the two files use different id values — ids must be unique across every
task in /agent/tasks, and a duplicate stops the run before any test executes:
- macOS / Linux
- Windows (PowerShell)
- Windows (CMD)
cat ./find-article.md | \
  docker exec -i waterwheel-agent upload-test-task find-article.md
cat ./verify-article.md | \
  docker exec -i waterwheel-agent upload-test-task verify-article.md
Get-Content ./find-article.md | `
  docker exec -i waterwheel-agent upload-test-task find-article.md
Get-Content ./verify-article.md | `
  docker exec -i waterwheel-agent upload-test-task verify-article.md
type find-article.md | docker exec -i waterwheel-agent upload-test-task find-article.md
type verify-article.md | docker exec -i waterwheel-agent upload-test-task verify-article.md
5. Declare the Flow
Nothing so far says which test runs first. Neither task file mentions the other — and that is
deliberate, because ordering lives outside the tests, in the flow array of
preset-context.json. The same two files can be reordered, reused, or dropped from a suite by
editing only the flow.
{
  "flow": [
    { "file": "find-article.md", "node": 1 },
    { "file": "verify-article.md", "node": 2, "required": 1 }
  ]
}
node labels a test so others can point at it; required names the nodes that must succeed
first. Push the file in and import it:
cat ./preset-flow.json | \
  docker exec -i waterwheel-agent upload-instruction-file preset-flow.json
docker exec -it waterwheel-agent preset-context flow /agent/instructions/preset-flow.json
The two-step dance is because preset-context flow resolves its path inside the container, so
the file has to be there first. Verify what was stored:
docker exec -it waterwheel-agent preset-context flow list
[
  {
    "file": "find-article.md",
    "node": 1
  },
  {
    "file": "verify-article.md",
    "node": 2,
    "required": 1
  }
]
If a file value does not match a discovered task, the agent treats it as fatal and exits
immediately rather than running a partial suite. Filenames are exact basenames — find-article.md,
not ./find-article.md or Find-Article.md.
6. Confirm the Order Before Spending Tokens
docker exec -it waterwheel-agent run-qa --dry-run
docker exec -it waterwheel-agent cat /agent/outputs/test-plan.json
{
  "results": [
    {
      "name": "Find Article",
      "file": "find-article.md",
      "id": "1",
      "status": "queued",
      "node": 1
    },
    {
      "name": "Verify Article Content",
      "file": "verify-article.md",
      "id": "2",
      "status": "queued",
      "node": 2,
      "required": [
        1
      ]
    }
  ],
  "generated_at": "2026-07-29T23:26:26.549Z"
}
This is the check worth doing every time you edit a flow. node and required now appear on the
plan entries, which means the flow parsed and attached to the right files — a typo in a filename
would have failed the run outright, but a missing node here means an entry silently did not apply.
Note that the scalar "required": 1 is normalized to the array [1].
7. Run the Chain
docker exec -it waterwheel-agent run-qa
docker exec -it waterwheel-agent check-test-result
Then read the results file, which is more informative than the one-line verdict:
docker exec -it waterwheel-agent cat /agent/outputs/test-results.json
{
  "results": [
    {
      "name": "Find Article",
      "file": "find-article.md",
      "id": "1",
      "status": "success",
      "result": "SUCCESS: Task: Find Article | Outcome: Searched for \"Docker\" and article page loaded with heading \"Docker\" | Confirmed: search_term=Docker, article_title=Docker",
      "node": 1
    },
    {
      "name": "Verify Article Content",
      "file": "verify-article.md",
      "id": "2",
      "status": "success",
      "result": "SUCCESS: Task: Verify Article Content | Outcome: All verification steps passed — article \"Docker\" found, heading and first paragraph confirmed | Confirmed: article_title=Docker, search_term=Docker",
      "node": 2,
      "required": [
        1
      ]
    }
  ],
  "total_duration_sec": 80,
  "status": "complete",
  "exit_condition": "All tests passed"
}
Read the two Confirmed: lists together — that is the chain working. The producer reports
article_title=Docker as a value it wrote, and the consumer reports the same key as a value it
read. If the consumer's list is missing the inherited key, the hand-off did not happen even though
both tests went green.
To pull the shared values out for use outside the container — reusing a generated account on your
next run, for example — use
output-context-variables, which prints them as flat
JSON:
docker exec -it waterwheel-agent output-context-variables
/agent/outputs/test-context.json holds the full context store, and it is more verbose than you
might expect: each entry carries a scope, purpose, timestamps, and read/write counts, and your values
appear under a user. prefix (user.article_title). Alongside them are the agent's own case.
entries for internal bookkeeping. Read it when you are debugging a hand-off — it shows whether a value
was ever written and how often it was read — but prefer output-context-variables when you just want
the values.
8. Watch a Dependency Cascade
The payoff for declaring dependencies is what happens when an upstream test fails. Break the producer so it cannot store anything — point step 1 at a domain that is not on the allowlist:
1. Go to https://example.com/not-allowed.
Re-upload it and run again. The producer fails, and the consumer does not run: with its required
node unsatisfied, it is marked abort rather than being executed against missing data.
{
  "results": [
    {
      "name": "Find Article",
      "status": "failed",
      "result": "FAILED: Navigation blocked by client (ERR_BLOCKED_BY_CLIENT). Check URL permission configuration.",
      "node": 1
    },
    {
      "name": "Verify Article Content",
      "status": "abort",
      "result": "Aborted: required node(s) 1 not satisfied",
      "node": 2,
      "required": [
        1
      ]
    }
  ],
  "total_duration_sec": 22,
  "exit_condition": "One or more tests failed"
}
Two things worth noting. The consumer's result names the unsatisfied node directly — required
node(s) 1 not satisfied — so you never have to guess which dependency stopped it. And the run took
22 seconds against 80 for the passing version: the agent spent no tokens on a test it knew could not
succeed. That saving is the practical argument for declaring dependencies rather than letting every
test run and fail on its own.
The status a downstream test receives depends on why its dependency was unsatisfied:
| Upstream node state | Downstream test becomes |
|---|---|
All required nodes success | Runs normally |
A required node failed | abort |
A required node abort or skipped | skipped |
That distinction matters when you read results: abort means this test's own dependency broke,
while skipped means the breakage happened further upstream. Both differ from ignored, which
means you excluded the test yourself with "ignore": true in the flow.
Put step 1 back, re-upload, and re-run to return to green. See Dependency Check Rules for the complete evaluation order.
Next Steps
- Create Test Skills — extract a flow every test in the chain repeats, such as login, into a reusable skill instead of copying the prose.
- Manage Test Tasks — the full reference for front matter, flow fields, every test status, and the authoring patterns for multi-node suites.
- Command Reference — all the options for
manage-global-constantsandpreset-context. - Token Efficiency — how to group chained tests so a suite stays cheap.
- Run through a code agent — let a code agent maintain the chain and fix what it breaks.