Write Your First Test
The Quick Start runs the sample test that ships inside the image. This guide takes the next step: you write a test of your own, load it into the agent, run it, and read the result — then break it on purpose to see how failures are diagnosed.
A Waterwheel test is prose, not a script. There are no selectors to look up, no waits to tune, and no assertion API to learn. You describe what to do and what you expect to see, and the agent decides how to drive the browser. That means the skill you need here is writing clear instructions, not writing code.
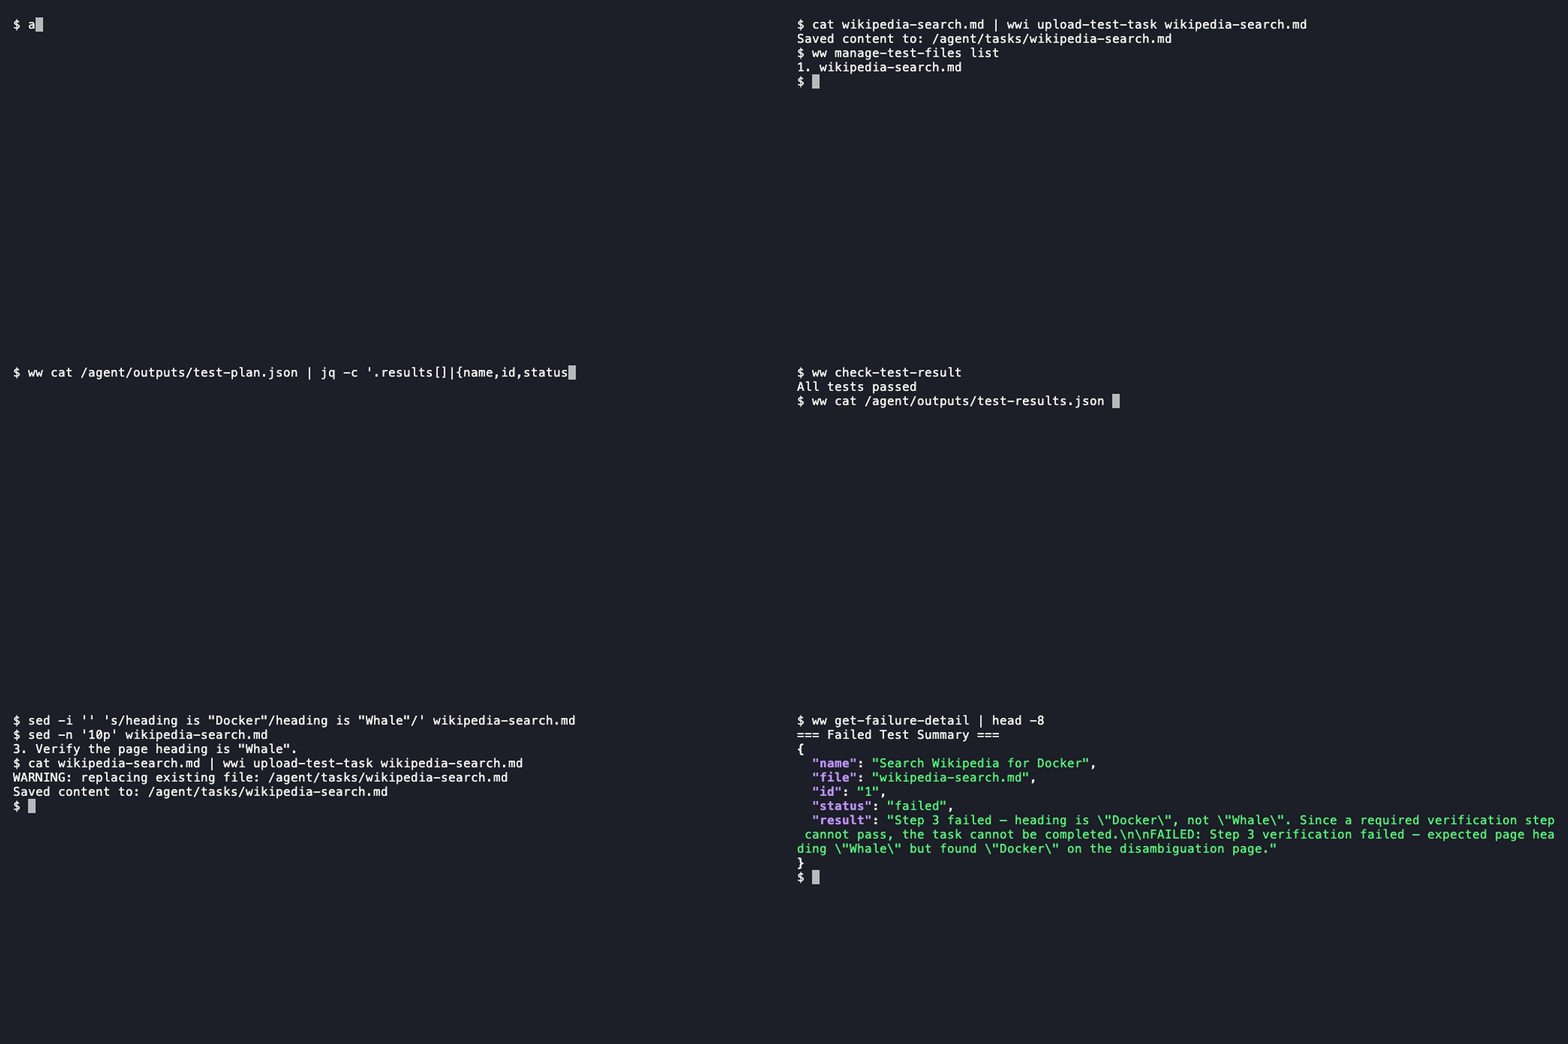
A real recording of the steps below against the 1.4.0 image, picking up at step 2. ww and wwi
are aliases for docker exec -it waterwheel-agent and docker exec -i waterwheel-agent, defined on
the first two lines. Waiting for the runs to finish is cut; all command output plays at normal speed.
You need a running, configured container — Quick Start steps 1 to 3. Everything
below assumes waterwheel-agent is up and an AI provider is already set. Nothing in this guide
reinstalls or reconfigures the agent.
1. See What Is Already Loaded
The image ships with one sample task. List the tasks currently loaded:
docker exec -it waterwheel-agent manage-test-files list
Remove the sample so your run has exactly one test in it and the output is unambiguous:
docker exec -it waterwheel-agent manage-test-files delete test-wikipedia-english.md
manage-test-files delete accepts a 1-based index or an exact filename. If the sample has a
different name in your image, take the name from the list output above. See
manage-test-files for all operations.
2. Write the Test
Create a file called wikipedia-search.md on your host machine. We use Wikipedia as the target
because it is public, stable, and needs no login — swap in your own application once the loop makes
sense.
---
name: Search Wikipedia for Docker
id: 1
---

# Search Wikipedia for Docker

1. Go to https://www.wikipedia.org.
2. Type "Docker" into the search box and submit the search.
3. Verify the page heading is "Docker".
4. Verify the article body mentions the word "container".
5. Verify a table of contents is visible on the page.
The file has two parts: optional YAML front matter, then the instructions. Both name and id are
optional — without them the filename is used — but name is what shows up in your results, so it is
worth setting. Any key you add that is not reserved becomes custom metadata in test-results.json.
See Manage Test Tasks for the full front-matter rules.
What makes a good step
- One action or one verification per line. Do not bundle "log in and check the dashboard" into a single step — the agent has less to recover from when a step is small.
- Quote expected text literally.
Verify the page heading is "Docker"gives the agent something to check.Verify the page looks rightdoes not. Copy the string off the page rather than typing what you assume it says — the agent matches text with some tolerance, so an approximate expectation can still pass, leaving you believing a check is tighter than it is. - Number your steps. Numbered steps are cheaper to run than free-form prose, because the agent spends fewer tokens working out what you meant. See Manage Test Tasks for the reasoning.
- Describe intent, not mechanics. Say "submit the search", not "click the button with id
searchButton". The agent finds the control; hard-coded selectors only make the test brittle.
There is no required Markdown structure. Any .md file under /agent/tasks is executed — plain
text with no Markdown styling at all works fine.
3. Load It Into the Container
Pipe the file in from your host with
upload-test-task:
- macOS / Linux
- Windows (PowerShell)
- Windows (CMD)
cat ./wikipedia-search.md | \
  docker exec -i waterwheel-agent upload-test-task wikipedia-search.md
Get-Content ./wikipedia-search.md | `
  docker exec -i waterwheel-agent upload-test-task wikipedia-search.md
type wikipedia-search.md | docker exec -i waterwheel-agent upload-test-task wikipedia-search.md
-i, never -it, when pipingAdding -t allocates a TTY, which corrupts the piped input and gives you a truncated or mangled
task file. Every command that reads from stdin — upload-test-task, upload-instruction-file,
load-test-skills — takes plain -i.
Confirm the agent picked it up:
docker exec -it waterwheel-agent manage-test-files list
You should see wikipedia-search.md and nothing else.
4. Allow the Domain
The agent's browser is deny-by-default. If it navigates to a URL that is not on the allowlist, the test fails immediately with a result like:
FAILED: Navigation blocked by client (ERR_BLOCKED_BY_CLIENT). Check URL permission configuration.
This is the single most common first-run surprise. Add Wikipedia:
docker exec -it waterwheel-agent set-domain-permission "https://*.wikipedia.org"
The quotes are consumed by your host shell before the argument reaches the container. Keep any entry
containing *, ?, or other shell-special characters quoted, exactly as shown.
The allowlist is overwritten on every call, so pass all the domains you need in one comma-separated list:
docker exec -it waterwheel-agent set-domain-permission \
  "https://*.wikipedia.org",https://www.google.com
See URL Permissions for the full matching rules.
localhost never works from inside the containerThe agent runs inside Docker, so localhost means the container itself, not your machine. Any
localhost URL fails to connect. If your application runs on your host, replace it with
host.docker.internal everywhere — in both the allowlist and your test files:
| Instead of | Use |
|---|---|
http://localhost:8080 | http://host.docker.internal:8080 |
The port stays the same; only the hostname changes.
# In the allowlist — -l rewrites localhost for you
docker exec -it waterwheel-agent set-domain-permission -l "http://localhost:8080"
1. Go to http://host.docker.internal:8080.
Rather than editing every URL by hand, run
enable-test-on-host once. It tells the agent to rewrite
localhost during test runs and fixes your existing allowlist and global constants in place:
docker exec -it waterwheel-agent enable-test-on-host
5. Dry Run First
A dry run parses your task, records the prompts the agent would use, and builds a test plan — without making a single API call. It is free, so make it a habit after every change.
docker exec -it waterwheel-agent run-qa --dry-run
The terminal only shows progress — the MCP servers starting up, 🧪 Dry-run mode enabled., then the
servers shutting down again. The interesting output goes to files. Read the plan:
docker exec -it waterwheel-agent cat /agent/outputs/test-plan.json
{
  "results": [
    {
      "name": "Search Wikipedia for Docker",
      "file": "wikipedia-search.md",
      "id": "1",
      "status": "queued"
    }
  ],
  "generated_at": "2026-07-29T07:26:20.005Z"
}
Check that name and id match your front matter and that exactly one task is queued. If the entry
shows the filename instead of your name, the front matter did not parse — usually a missing ---
delimiter.
run-qa clears /agent/outputs as its first step, so test-plan.json from the dry run disappears
the moment you start the real run.
6. Run It
docker exec -it waterwheel-agent run-qa
This is the step that spends tokens. The five-step test above takes well under a minute — the agent
opens a browser, works through your steps, and writes its results and logs to /agent/outputs.
Longer suites run for several minutes. To abort a run in progress, open a second terminal and use
stop-qa:
docker exec -it waterwheel-agent stop-qa
7. Read the Result
docker exec -it waterwheel-agent check-test-result
This prints the exit condition summarizing the run:
All tests passed
If the run is still going, it says so and prints the orchestrator PID instead. If you see
ℹ️ No test results found., the run never produced results; the command follows that with the
contents of agent.log so you can see why.
For the full picture — including what the agent actually confirmed on the page — read the results file:
docker exec -it waterwheel-agent cat /agent/outputs/test-results.json
{
  "results": [
    {
      "name": "Search Wikipedia for Docker",
      "file": "wikipedia-search.md",
      "id": "1",
      "status": "success",
      "result": "SUCCESS: Task: Search Wikipedia for Docker | Outcome: Navigated to Wikipedia, searched \"Docker\", and confirmed heading \"Docker\", article body contains \"containers\", and table of contents is visible | Confirmed: heading=Docker, keyword=containers, toc_visible=true"
    }
  ],
  "starts": "2026-07-29T19:07:03.873Z",
  "ends": "2026-07-29T19:07:43.562Z",
  "total_duration_sec": 40,
  "status": "complete",
  "exit_condition": "All tests passed"
}
The result string is the agent's own account of what it verified. Read it even when the test
passes — it is how you catch a test that went green for the wrong reason.
8. Break It on Purpose
The real workflow is not "write a test that passes" — it is "read a failure and act on it". Make
your test fail so you can see what that looks like. Change step 3 in wikipedia-search.md to expect
something that is not there:
3. Verify the page heading is "Whale".
Upload it again under the same filename. The existing task is replaced, and the command tells you so:
WARNING: replacing existing file: /agent/tasks/wikipedia-search.md
Saved content to: /agent/tasks/wikipedia-search.md
- macOS / Linux
- Windows (PowerShell)
- Windows (CMD)
cat ./wikipedia-search.md | \
  docker exec -i waterwheel-agent upload-test-task wikipedia-search.md
Get-Content ./wikipedia-search.md | `
  docker exec -i waterwheel-agent upload-test-task wikipedia-search.md
type wikipedia-search.md | docker exec -i waterwheel-agent upload-test-task wikipedia-search.md
Run it again, then ask for the details:
docker exec -it waterwheel-agent run-qa
docker exec -it waterwheel-agent get-failure-detail
check-test-result now reports One or more tests failed, and get-failure-detail prints a full
diagnostic report for the first failed test. Each section is introduced by a === Section ===
header, in this order:
| Section | What it tells you |
|---|---|
| Failed Test Summary | The result object for the failed test |
| Test Detail | The task file the agent was given |
| Test Steps | Every step the agent decided on and every tool call it made |
| Test Context | Context values held at the end of the run |
| Agent Log | The full agent execution log, including the system prompt |
Expect a few hundred lines. The part that usually settles it is the very top:
=== Failed Test Summary ===
{
  "name": "Search Wikipedia for Docker",
  "file": "wikipedia-search.md",
  "id": "1",
  "status": "failed",
  "result": "FAILED: Task: Search Wikipedia for Docker | Step 3 failed — expected heading \"Whale\" but actual heading is \"Docker\". Steps 4 (body mentions \"container\") and 5 (table of contents visible) passed but were not recorded due to snapshot release."
}
The agent names the step that failed, what it expected, and what it found instead — which tells you whether the bug is in your application or in the wording of your test. When that is not enough, Test Steps shows every action and tool call it made on the way there.
-d flag needs API logging turned onget-failure-detail -d appends the LLM API log to the report, but the agent does not write
api-log.json by default. It is only produced when the container is created with
ENABLE_API_LOGGING=true:
docker run -d --name waterwheel-agent \
  -e AI_API_KEY \
  -e ENABLE_API_LOGGING=true \
  taojdcn/duotail-waterwheel:1.4.0
Without that variable, the API Log section is silently omitted from the report — the rest of the report is unchanged. See the environment variable reference.
Now put step 3 back the way it was, re-upload, and re-run to confirm you are green again.
Next Steps
- Chain Tests Together — split a journey into dependent tests, share static values through global context, and pass a value discovered by one test to the next.
- Create Test Skills — teach the agent a tricky interaction once, and reuse a repeated flow across tests without copying the prose.
- Manage Test Tasks — the full reference for front matter, flow fields, and test statuses.
- Command Reference — every command in the container, with all options.
- Run through Docker Compose — mount your tasks and instruction files from the host instead of piping them in.
- Run through a code agent — hand the whole loop to a code agent such as Claude Code and let it fix what it finds.